
In today’s digital-first world, having a visible online presence is crucial for businesses of all sizes. One of the most impactful ways to boost your local visibility is by adding your business to Google Maps. Not only does it help potential customers find you quickly, but it also builds credibility and trust. However, for many business owners, especially new ones, the process of adding a listing can feel overwhelming. The good news is that by following a clear, step-by-step approach, you can set up and optimize your Google Maps business listing effectively. In this guide, you’ll learn exactly how to add your business to Google Maps and maximize its impact for search visibility.
Why a Google Maps Listing Matters
Before diving into the how-to section, it is important to understand why a Google Maps listing is so powerful. When users search for a service or product near them, businesses with a verified Google Maps listing appear in the Local Pack, a prominent section on the search results page. This means more visibility, more website clicks, more calls, and ultimately, more customers. Furthermore, reviews, ratings, and business information all display directly, making it easier for customers to make a decision without even visiting your website.
Therefore, by listing your business on Google Maps, you significantly increase your chances of attracting nearby customers who are ready to take action.
Step 1: Create or Sign into Your Google Account

The first step toward adding your business to Google Maps is having a Google Account. If you already have one, you are ready to go. If not, setting up a new account is simple and free. Visit accounts.google.com and follow the prompts to create one. Using a business-specific email account is advisable because it helps keep your professional activities separate from your personal ones. This separation will also be useful later on if multiple team members need access to your business listing.
Once you have your Google Account ready, you can move to the next step confidently.
Step 2: Access Google Business Profile
Formerly known as Google My Business, Google Business Profile is the tool you’ll use to manage how your business appears across Google Search and Google Maps. To start, go to google.com/business and click on “Manage Now.” This action will bring you to a page where you can either add your business or claim an existing listing.

If you find that your business already exists on Google Maps but is unclaimed, you can claim it instead of creating a new listing. This process avoids duplication and ensures your customers find the correct and official business profile.
Step 3: Enter Your Business Name
Next, you will be asked to provide your business name. It is crucial to enter it exactly as you want it displayed. Avoid keyword stuffing, meaning you should not try to cram extra descriptive terms into your business name unless they are officially part of it. For instance, if your official name is “Sunny Day Spa,” do not list it as “Sunny Day Spa Best Massage and Facials.” Staying consistent ensures that your brand looks professional and aligns with Google’s guidelines.

If your business name changes in the future, you will always have the option to update it, but consistency at this early stage builds long-term trust.
Step 4: Choose Your Business Category
Choosing the correct business category is extremely important because it helps Google understand what your business offers and match it with relevant search queries. When you type a word related to your business, Google will suggest options. Be specific but accurate. If you are a bakery specializing in wedding cakes, “Bakery” would be correct, but “Wedding Bakery” could be even better if it fits the available categories.

Additionally, you will have the opportunity to add secondary categories later on. This flexibility helps you reach more potential customers while maintaining relevance.
Step 5: Add Your Business Location
At this stage, you will need to indicate whether you have a physical location that customers can visit. If you do, you will be prompted to add your address. Ensure that the address details are accurate, including suite numbers if applicable. Google will use this information to pin your business location on the map.

If you operate a service-based business without a customer-facing location, you can choose to hide your address and instead define your service area. This option is especially useful for businesses like plumbing, cleaning services, or home repair.
Remember, clarity here is essential. You want your customers to easily find you without confusion.
Step 6: Specify Your Service Areas
If you selected the option to define a service area, Google will allow you to specify the cities, postal codes, or regions you cover. Listing these areas accurately helps Google match your business with people searching for services in those areas. It is a great way to extend your reach without misleading users about your physical location.

You can always add or remove service areas later as your business grows or shifts focus.
Step 7: Add Contact Details
Providing accurate and up-to-date contact information is vital. Enter your primary business phone number and website URL. If you do not have a website, Google offers a free simple website that automatically pulls information from your Business Profile. While this basic website is a good start, having a professionally designed website eventually gives you more control over your branding and SEO.

Your contact information should match exactly with what you have listed elsewhere online, including social media pages and directory listings. This consistency, often referred to as “NAP consistency” (Name, Address, Phone Number), strengthens your local SEO performance.
Step 8: Verify Your Business
Before your listing can appear publicly, Google needs to verify that you are indeed the owner or authorized representative of the business. Verification methods can vary based on the type of business and location, but the most common is postcard verification. Google will mail a postcard with a verification code to the business address you provided.

When the postcard arrives, usually within five business days, log into your Google Business Profile dashboard and enter the code to complete the verification process.
In some cases, you might be eligible for phone, email, or instant verification, especially if your business was previously verified through Google Search Console.
Verification is a critical step, and completing it promptly ensures your listing goes live without unnecessary delays.
Step 9: Optimize Your Business Profile
Once your business is verified, it is time to optimize your profile. Start by adding high-quality images of your storefront, products, services, and team members. Photos build trust and engagement. Businesses with photos receive significantly more clicks and requests for directions than those without.
Write a compelling business description that clearly explains who you are, what you offer, and why customers should choose you. Incorporate relevant keywords naturally but avoid keyword stuffing.
You should also list your business hours, including special hours for holidays. Inaccurate or outdated hours can frustrate customers and hurt your credibility.
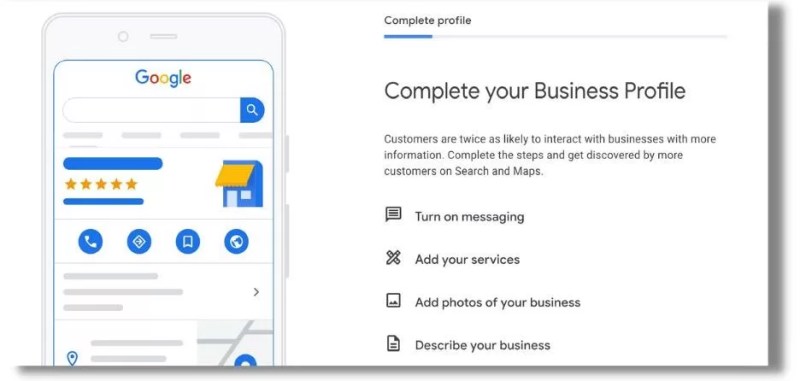
Over time, updating your profile with posts, special offers, and events keeps your listing active and shows Google that your business is engaged and responsive.
Step 10: Encourage and Respond to Reviews
Reviews are a powerful influence on consumer behavior and an important factor in local SEO rankings. Encourage satisfied customers to leave positive reviews on your Google Business Profile. You can ask them in person, via email, or through a follow-up text message.

Equally important is responding to reviews — both positive and negative — promptly and professionally. Thank customers for their feedback and address any concerns raised. This interaction shows potential customers that you care about providing excellent service and are committed to continuous improvement.
Building a strong base of positive reviews not only improves your online reputation but also signals to Google that your business is trustworthy and customer-centric.
Step 11: Regularly Update Your Listing
Setting up your listing is not a one-time task. To maintain and grow your visibility, you should regularly update your business profile. Add new photos, update operating hours, post announcements, and answer customer questions through the Q&A section.

Frequent updates keep your business profile fresh and engaging, and Google tends to favor listings that show signs of active management.
Furthermore, monitoring your profile’s performance through the Insights section in Google Business Profile helps you understand how customers are finding and interacting with your business, allowing you to make data-driven improvements.
Adding your business to Google Maps and maintaining a well-optimized Business Profile is one of the smartest moves you can make to increase your local visibility. Although the process may seem detailed, taking it step by step ensures you create a robust online presence that benefits both your business and your customers.
Related Article: Top 16 Social Media Platforms in 2025 [+ Marketing Tips]
In a world where consumers expect to find accurate, easily accessible information at their fingertips, ensuring your business is properly listed and optimized on Google Maps is not just important, it is essential. By following this detailed guide, you position your business to capture more local traffic, build trust with your audience, and achieve sustainable growth in the competitive digital landscape.
